
Okay, I posted a pic of the opening of the box of my seed potatoes a few days ago here. When I opened it I saw a small wet spot from the top, but it looked okay overall.
Weeeellllll, when I brought out that bad of potatoes it was a hot mess that smelled as only rotten potatoes can. It looked like the Colorado Rose seed potatoes had pretty much disintegrated and spread the nastiness all around.
I managed to clean off and save 3 All Blue seed potatoes, 1 Yellow Finn and no Colorado Rose. There are a couple each of Blue and Yellow that only have rot on a small part of them.
How do I, or can I even, save those?
Now, I only ordered 5 lbs since this was just for first time fun growing, but the idea of losing all my seed potatoes except 4 out of them all is pretty bad.
I've written to their customer service and we'll see what happens. But what I would like to know is: Is that much rot normal? Do you get rotten ones in your seed potato orders? If so, how much and how often? Do you just order more than you need to compensate? And how do you prevent the nasty rot juice from corrupting the others in the box?
Any and all info so I'm not such a total amateur is most welcome. :)
Showing posts with label Seed Starting. Show all posts
Showing posts with label Seed Starting. Show all posts
Wednesday, February 11, 2009


Wednesday, January 21, 2009
Seed Starting Status and My First 2009 Load of Dirt
Early seed starting is moving right along. I'm set to plant some things as early as the beginning of March (those things calling for planting before last frost) and I've started seeds for those things going in at the end of March. And as of today, even my tomato seeds have been started.
Here is a picture of my final seed starting setup with both Jump Start lights in place. I did find this system in other places and was amazed that the cost was 50-90% more than the place I got it. Gotta love a good deal.
 This window is almost south facing, slightly south-southeast really, and I worried that it wouldn't get enough light on the seeds which is why I bought the lights. I may have actually been able to get away with less. As you can see, the seedlings are all leaning forward, towards the window.

While I am using the trays with peat cells for some, what you see below is actually my favorite way to start seeds. The containers are Beneful Ready Meal containers. I re-use them for the home made dog food but had so many last year I gave this a try and found it wonderfully effective.
I simply put 5 dents in the starter mix in the container and start five seeds for bigger items like peppers or tomatoes. For things like leeks and onions, I just sprinkle them on thinly and cover with a bit more soil mix. What makes it great is that I don't waste whole cells for seeds that don't sprout and getting them apart is a breeze. I just wait till I would normally water and pop the whole, slightly dry, hunk of soil and plants out onto the transplant area. Then I douse with water and it separates all by itself. Teasing apart over developed roots can be a bit of trouble, but timing is everything.
 Don't the newly sprouted onions look lovely and delicate? I love the smell of them as I'm now thinning out the weak.
 And now for my most recent bout of self-punishment via dirt movement. Here is my delivery of 6 cubic yards of topsoil. In the picture below, I've actually already taken off a bit of the back section so it isn't quite as tall as it was.
 And here is what it looked like the next day. I did get it all moved on Saturday and Sunday afternoon, despite the hours of misting that made it get ever heavier.

Here is a picture of my final seed starting setup with both Jump Start lights in place. I did find this system in other places and was amazed that the cost was 50-90% more than the place I got it. Gotta love a good deal.
 This window is almost south facing, slightly south-southeast really, and I worried that it wouldn't get enough light on the seeds which is why I bought the lights. I may have actually been able to get away with less. As you can see, the seedlings are all leaning forward, towards the window.
While I am using the trays with peat cells for some, what you see below is actually my favorite way to start seeds. The containers are Beneful Ready Meal containers. I re-use them for the home made dog food but had so many last year I gave this a try and found it wonderfully effective.
I simply put 5 dents in the starter mix in the container and start five seeds for bigger items like peppers or tomatoes. For things like leeks and onions, I just sprinkle them on thinly and cover with a bit more soil mix. What makes it great is that I don't waste whole cells for seeds that don't sprout and getting them apart is a breeze. I just wait till I would normally water and pop the whole, slightly dry, hunk of soil and plants out onto the transplant area. Then I douse with water and it separates all by itself. Teasing apart over developed roots can be a bit of trouble, but timing is everything.
 Don't the newly sprouted onions look lovely and delicate? I love the smell of them as I'm now thinning out the weak.
 And now for my most recent bout of self-punishment via dirt movement. Here is my delivery of 6 cubic yards of topsoil. In the picture below, I've actually already taken off a bit of the back section so it isn't quite as tall as it was. And here is what it looked like the next day. I did get it all moved on Saturday and Sunday afternoon, despite the hours of misting that made it get ever heavier.
I used this topsoil to create a level area for my 2 new raised beds to go on. So none of this is even garden dirt but rather a base. I'm letting it settle for a couple of weeks before setting up the new beds and then filling them with a further delivery of compost mix.

Sunday, January 18, 2009
Dinner in Winter...Almost Like Summer
During the summer I posted lots of pictures of the results of my initial canning efforts. Jewel-like colors and so beautiful. Of course, I was excited to have done it and feeling very satisfied with the outcome. But how did it really turn out, you might wonder? How many exploded, rotted or otherwise didn't make it? How did stuff taste? Was it really better?
Not a single one went bad...not one jar out of all those dozens and dozens.
But...I'll admit that I was very dubious of eating my own jarred up food. I'd read so often of the dire dangers of doing anything even slightly wrong, that I'd surely die of botulism or at least get seriously ill that I had myself paranoid beyond belief.
It took a serious act of faith to open up the first non-acid food that I'd jarred myself. Tomatoes and things like that, acid foods, I didn't worry about since those aren't potential carriers. And those were delicious like you wouldn't believe. But corn, green beans...things like that?
Before I opened the first ones, I brought them up, examined them with every light on, held them up by just the little lid to be sure they were still in a vacuum, shook them and then held them up again. Listened for the pop when I opened them and then looked at them again.
It smelled just the same as the day I packed it, so fresh and clean. I added the corn to the goulash (sp?) I was making and then stood, paranoid but determined, until it was ready.
Oh my, how delicious it was! It has a texture, almost a crispness, that it does when it is very fresh and on the cob that no store bought version is going to give you.
After that, it was field day with the jars. Now, I still take reasonable precautions and check things like the seal and discoloration, but I do that with stuff I buy in cans too so there is nothing new there.
Currently, I'm starting to run out of things and am ever so sad to see them go.
As a step towards a greater sustainability in my life, I could hardly have done anything better. Growing your own food in season is great, but making it last after the season is the best.
Just think of this: Fresh food gets trucked an unknown distance to a factory where it is processed at high temps using large quantities of water and cleaning solutions, put into cans that use large quantities of metals, paper or plastics (for those single serve things). It is then trucked out, even right to the place it may have grown. Then you drive your car to pick them up at the store and then toss that can and paper right into the garbage, (or recycling if you have it). What a mess for a single can of green beans.
For my jar of green beans: I grow them, enjoying them right from the vine and having extra, I clean them, jar them in glass jars I'll re-use countless times, process them on my energy efficient stove and then open them whenever without going to any store. In fact, the only thing I use is one part of a 2 piece lid that has to be recycled and water. That's it.
You tell me which is the best one for our little green and blue planetary body?
But as I start new seeds for this year, I'm keeping all that in mind and this year, I'll have twice as much to go in the jars!
Heirloom Seeds and Another Grow Light..With Info!
After I posted a picture of my little grow light set up for seed starting, I got some emails asking about it, particularly in terms of price and how it is performing. I did some looking around and did notice that most grow light systems are pretty darn expensive. Bigger ones have the added disadvantage of not being very portable.
So it looks like I got really lucky and now that I've ordered a second one, I'll share the link! The one I got is the Green Thumb Jump Start System. I got it from YardLover.com and the price was only $65, which is about half the price of the same size system everywhere else. (No, I'm not getting a kick back so click away!)
It came with 2 48 inch bulbs of the full spectrum sort also. It is quite sturdy, easy to put together and very user friendly. So, yes, I do recommend it.
As I said, I ordered a second one today. I'll be putting it on that same table right in front of the other one. Then I can fit pretty much my whole seed starting operation on that one table. Pretty nifty, huh.
Seed orders are being made and rolling in now. I got my Baker Creek Heirloom Seed order in and have started quite a few of them just yesterday. Their catalog is just luscious and even their seed packets are adorable and ever so retro. Here are just a few from this order.

I'm thinking that a lot of people will think I'm awfully early with seed starting since I am in Virginia, but I'm not really. Last frost date is March 25th and on top of that, I'm on the tidally influenced river and the climate is moderated some at my house because of that big body of water coming by all day.
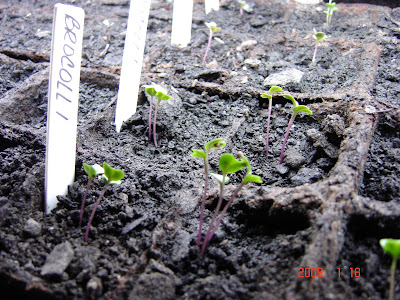
Speaking of my seed starting, some of my stuff is coming up and they look so tiny and perfect. My brocolli below.
 And here are my spanish and red onions. Yes, I do know there are too many in a cell. I cull them some so the weak should tremble! I actually have pretty good luck with just tearing the cell off and teasing them apart to transplant. At least I did last year.
 And even with my very hefty Baker Creek order in, I have loads more coming. I do love variety and I'm slowly switching to open pollinated heirloom varieties. This is what my collection to date looks like. Yes, that is a shoe box..lol.
 And just because we haven't seen him in a while, here is Boscoe saying how much he misses everyone after the holidays. It seems he put on a little bit of belly with the holiday bounty!

So it looks like I got really lucky and now that I've ordered a second one, I'll share the link! The one I got is the Green Thumb Jump Start System. I got it from YardLover.com and the price was only $65, which is about half the price of the same size system everywhere else. (No, I'm not getting a kick back so click away!)
It came with 2 48 inch bulbs of the full spectrum sort also. It is quite sturdy, easy to put together and very user friendly. So, yes, I do recommend it.
As I said, I ordered a second one today. I'll be putting it on that same table right in front of the other one. Then I can fit pretty much my whole seed starting operation on that one table. Pretty nifty, huh.
Seed orders are being made and rolling in now. I got my Baker Creek Heirloom Seed order in and have started quite a few of them just yesterday. Their catalog is just luscious and even their seed packets are adorable and ever so retro. Here are just a few from this order.
I'm thinking that a lot of people will think I'm awfully early with seed starting since I am in Virginia, but I'm not really. Last frost date is March 25th and on top of that, I'm on the tidally influenced river and the climate is moderated some at my house because of that big body of water coming by all day.
Speaking of my seed starting, some of my stuff is coming up and they look so tiny and perfect. My brocolli below.
 And here are my spanish and red onions. Yes, I do know there are too many in a cell. I cull them some so the weak should tremble! I actually have pretty good luck with just tearing the cell off and teasing them apart to transplant. At least I did last year.
 And even with my very hefty Baker Creek order in, I have loads more coming. I do love variety and I'm slowly switching to open pollinated heirloom varieties. This is what my collection to date looks like. Yes, that is a shoe box..lol.
 And just because we haven't seen him in a while, here is Boscoe saying how much he misses everyone after the holidays. It seems he put on a little bit of belly with the holiday bounty!
Tuesday, January 6, 2009
Garden Season of 2009 is Starting Early!
Oh yes, the seed catalogs have been coming in and I've been a drooling over the bright and shiny pictures of rare and heirloom plants. I've got dozens of sticky tabs in the catalogs and literally hundreds of marks on pages indicating my "short list" of possibles for this year.
The gardener's dilemma is truly hitting me: How can I wait even one more day even when I know it isn't time yet?
Yeah, well, I didn't wait.
This winter I purchased some things from my List (previously posted about) and got set up for starting seeds with a little less trouble and a little more success this year. In the picture below you can see my initial set-up.

I bought a full spectrum flourescent grow light stand and a longer folding table to set it on. I put it in a large unused room with full southern exposure from those 2 big windows. When set longways, I can fit 2 large seed flats under it. If set shortways, then 4 will fit.
A little later in the season, when I just put seeds in a little dish with soil in it and transfer after they sprout, I'll be able to fit a fairly comfortable number under there.
On January 4th, I started a bunch of Red and Yellow Onion seeds as well as some eggplant seeds from the slowest of last years eggplants. I'm determined to get adept at growing onion from seed and last year I started them February 1st, which gave me only small onions to harvest.
According to my ridiculously complicated schedule, in two weeks I'll start seeds for a great many of my other veggies and that will make me very happy.
So now, I'd best get cracking on those seed catalogs. Stop drooling and start ordering is my rule for the day!
Friday, August 15, 2008
State of the Garden...15 August 2008
Not many pictures to post yet, but I'll get out amongst the swarms of mosquitoes to get more today or tomorrow. And that brings me to my first update! The mosquitoes are a nightmare right now. The combination of good soil, occasional really hard rains that leave just enough puddlling and my naturalized part of the yard mean it is an ideal breeding ground. And to top it off, I'm a magnet for the little blood suckers! At this point, unless it is the hottest part of the day when they are not active, I wear long sleeves and jeans even in 100+ degree weather while working out there. But it is so worth it!
Just look at one afternoon's worth of pick up. That doesn't include the beans and grape tomatoes either. Just the big ones. For lots of gardeners, this doesn't represent much, but to me this is heaven. All organically grown using a new gardening technique and with having made a few pretty dire mistakes in where I placed a few of the raised beds so I'm happy.

Below is a snap of my butternut squash. While fruit are setting and looking pretty fantastic, there are spots on the leaves that have me confused. What is that? Is that just the effects of having my stucco re-done around the bottom of my house, which created clouds of dust that had to be hosed off every day? Is that a disease? Is it the effect of having placed my squash bed in a place that wound up getting a little less light than they really need?
 Right now my tomatoes are going strong on their second flush of fruit, most of them gaining good sizes quickly and leaving me breathlessly waiting for the ripening. I'm particularly excited because the ones fruiting now are my heirlooms, which I had begun to despair of ever setting fruit. My eggplants are loaded and gaining size daily. And the second flush of peppers are set and growing, but too slowly for me. I inspect them like the avid fan I am every single day. See my previous entry if you want to know the two types that have me over the moon this year.
Planting for fall crops is on the schedule for this weekend. Carrots, parsnips and the like are going in as seeds while I'm going to re-start the seeds for the things like cauliflower, cabbage and brussell sprouts. Something I can't identify has nipped off the tender young growth of my previous starts so I'm on the lookout for the brave thief who'll do that right on my own deck! Pole beans are coming as are the bush beans. I think from now on I might stick with pole beans. Not only because of the taste, but because I simply don't see the ripe beans in the bush beans until they get oversized. It is much easier with pole beans.
Squash is still so-so and it is directly related to their position, I'm sure. I'll be moving the squash bed this winter too so they can get more sun during the best of summer. My bad. Which is ironic, I think. Most people have luck with those crops if nothing else and have so much they feed it to chickens. But me, I need hundreds of pounds of the combined crops for making dog food over the winter and can get only enough for fresh eating.
And here I am. Just a snap for my mother...

And for all those breathless Boscoe fans, here is the big man! His leg looks fantastic doesn't it? The hair is growing back and while I do miss his little naked old man butt, I'm sure he is happier with his right cheek well covered. I don't think the scar will be evident at all once it is fully regrown. He is doing exceptionally well and he is chafing at the bit at the enforced rest now. Once he gets moving and warmed up, he has only the slightest of limps, something most wouldn't even recognize as a limp. That is far better than when he came home from my sister's in early June so the surgery looks like a success at this point. He has gone on a short walk to the water this past week because he was so stir crazy and enjoyed himself immensely, marking every tree on the route with glee. But, we do have to be careful. The surgeon made sure I understood that most surgery failures happen from 3 to 8 weeks post surgery because owner's give in to the dog's desire for more activity. So I'm holding steady and giving only minimal surrender to his pleas. Isn't he adorable with his head cocked to the side?

Wednesday, May 7, 2008
Re-potting Transplants or Why I Desperately Want a Potting Shed
While I shudder to think of anyone looking at this blog thinking that this is what my kitchen looks like, it is quite true that a picture is worth a thousand words. So here is my thousand words showing my kitchen counter after a couple of hours of re-potting transplants into small peat pots.

Pictures have a tendency to make things appear less dirty than they are at times and this is no exception. There was potting mix, vermiculite and peat everywhere. It took forever to get it out from between the boards of the floor and the seams of the sink, etc. But the result is so worth it.

Just look at all those lovely plant-lings ready for action.
Sunday, April 27, 2008
Building the Basics
By February I had a pretty good plan, or at least I thought so and had my wish list at Burpee all set up. But I needed the raised beds and that was a bit intimidating.
I really struggled with getting started building the beds. Because I really have no experience with, well, anything related to gardening, I second guessed myself right into inactivity for quite some time.
First off, this isn't my last home and because I could get transferred as early as next year, though hopefully not for 2 years after that, I didn't want to do something I couldn't undo when the house goes to market. I also got terrified of all the warnings from every source about contaminants in building materials that get into food crops grown in it. I also didn't like the look of so many that have pictures posted, with their sagging unkempt boards or tacky plastic decorative borders.
I wanted something that looked clean, neat and was not going to be impossible to either afford, source or build with. Sure...right...
After about a month of trying to get actual eco-lumber, which is made from recycled plastics but is not the stuff used on decks, I had to chuck that idea. Using the deck stuff is easier to source locally, but it does bend quite a bit and for many of them there are some issues with the edges in our blistering heat. Getting the actual lumber required special orders, vague delivery promises and considerable price differences from standard lumber.
Ditto with the the fancy natural lumber that is fairly resistent to any termite activity.
So, I went with untreated 2 x 6's and felt happy to finally make the decision. Building them was actually really easy in terms of engineering it and my niece and I had a good afternoon getting them built. We got a system down and it went like an assembly line after a while.

And here is Vanna working on putting in screws on the first layer.
I let them sit outside near the house to swell and shrink as they liked for a couple of weeks while I waited for my dirt delivery. I calculated that I had approximately 41 cubic feet, or 1 yd 14 ft, of space within the boxes to fill, but I would need considerably more to level them out and then have a bit left over to put a fresh inch on my front shrub beds. I got the minimum order of 3 cubic yards set for delivery in March.
Meanwhile, like most people who are planning their garden, whether novice like me or vastly experienced, I simply couldn't wait to start things off. Some of my seed orders had come in and I had done some early purchases of the more common varieties here locally. I also had bought 3 different kinds of seed starting systems so I could compare them. Hmm....sounds like I was ready, doesn't it?
I filled up those seed starting trays with so much stuff it was ridiculous. The Burpee Ultimate Seed Starter is pretty cool because it has a mat that wicks the water up from the resevior into the plants, encouraging root growth. It is lower maintenance for sure. I also got the cheap stand by, Jiffy and a good standard Morse that uses expanding peat pellets.
While this drama of seedlings is playing out right to this day, I do have some feedback after 2 months for all of these.
Bottom line, I like using the empty Beneful Prepared Meals containers better than all of them.
Why? It seemed to me that unless I was planting all the cells with the same kind of plant, there was no way to ensure success. Putting the tray into the light as soon as you get sprouts can kill some of the more tender ones and still not be enough for some of the light hungry ones.
For the peat pellet brand, I found the density of the swollen out peat to be simply too hard for some rootlets to get through and they didn't do nearly as well as the Beneful container ones. With this one, it also holds water exceptionally well and too well for some types of plants. The first ones I did were onion seeds because I wanted to see if I could grow some from seed as well as sets purchased later. They did well at first but the peat was simply too wet for them and very few survivied long enough to be bedded down.
The cheap Jiffy one did okay simply because I controlled the mix that went into it. It has the same problem of needing to have the same or very similar plants seeded into it so sunlight consistency wouldn't be an issue, but by creating my own mix of loose peat, vermiculite and a bit of miracle grow potting mix I did get a soil that was loose enough for delicate roots and held moisture at just the right level for the right amount of time.
For other novices out there though, just use old butter tubs and the like and save yourself $100.
Yes, I did spend that much on that stuff. I did read another exceptionally brilliant idea on the Homesteadingtoday.com forum. (I apologize to whoever had this idea that I'm not using your name but I can't find it again now.) He gets those smaller clear salad containers from his local grocery salad bar, stacks them up and, since it is charged by weight, simply has those weighed under that code and gets the perfect starters for a few cents. Brilliant! I will definitely be using that one next year.
Subscribe to:
Posts (Atom)